We have recently received an inquiry regarding the integration of Power BI with ArcGIS feature services. The short answer is: “Yes, Power BI can be used to query ArcGIS Online or Enterprise feature services.” However, it’s important to note that the process is not entirely straightforward. In this guide, we will provide a simple example of how to connect the two platforms, enabling you to schedule data extraction from ArcGIS feature services into Power BI online.
Let’s begin by selecting a feature service that we can use as our example. In this case, we will choose a feature service from our ArcGIS Enterprise 11.1.
For this exercise, we will utilize a feature service that focuses on public schools in Western Australia, which has been published on our ArcGIS Enterprise 11.1 platform.

As the service is secure, we will need to establish a connection through OAuth using a unique client ID and secret. Our focus will be on two platforms: ArcGIS Online and ArcGIS Enterprise. Each platform requires a distinct process to obtain the client ID and secret, which we will guide you through step by step for each one.
ArcGIS Online
For ArcGIS Online, please visit https://developers.arcgis.com/ and log in using your ArcGIS Online username and password. Upon successful login, you will be redirected to the ArcGIS developer’s dashboard.

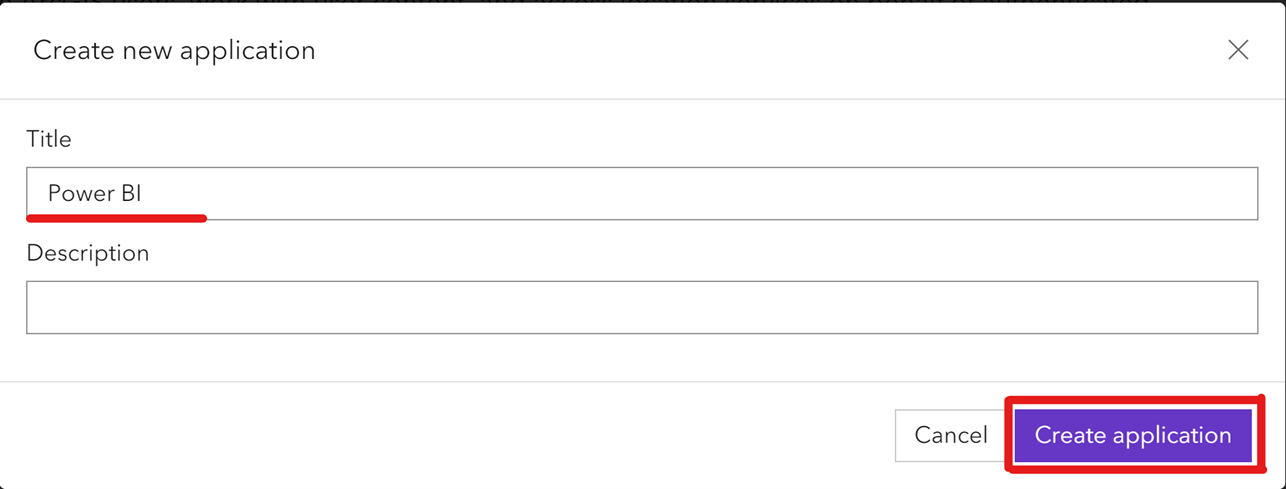
On the developer’s dashboard, click on “OAuth 2.0” and then select “New Application,” as demonstrated in the screenshot above. A new pop-up will appear; please enter the title as “Power BI” for this exercise and click on “Create application.”
After successfully creating the application, you will be presented with the following screen, where you can utilize the temporary token to query the ArcGIS Online feature service. Please note on the temporary token expiration date and ensure the token is not expired.

We have now successfully obtained a client ID, client secret, and temporary token for ArcGIS Online.
ArcGIS Enterprise
For ArcGIS Enterprise, the process involves two steps. First, is to create a client ID and client secret. Then, in the second step, is to generate the token. We will guide you through each step in detail here.
First, let’s navigate to the ‘Content’ section in ArcGIS Enterprise Portal. Once there, click on ‘New item’ to create a new item in our portal.

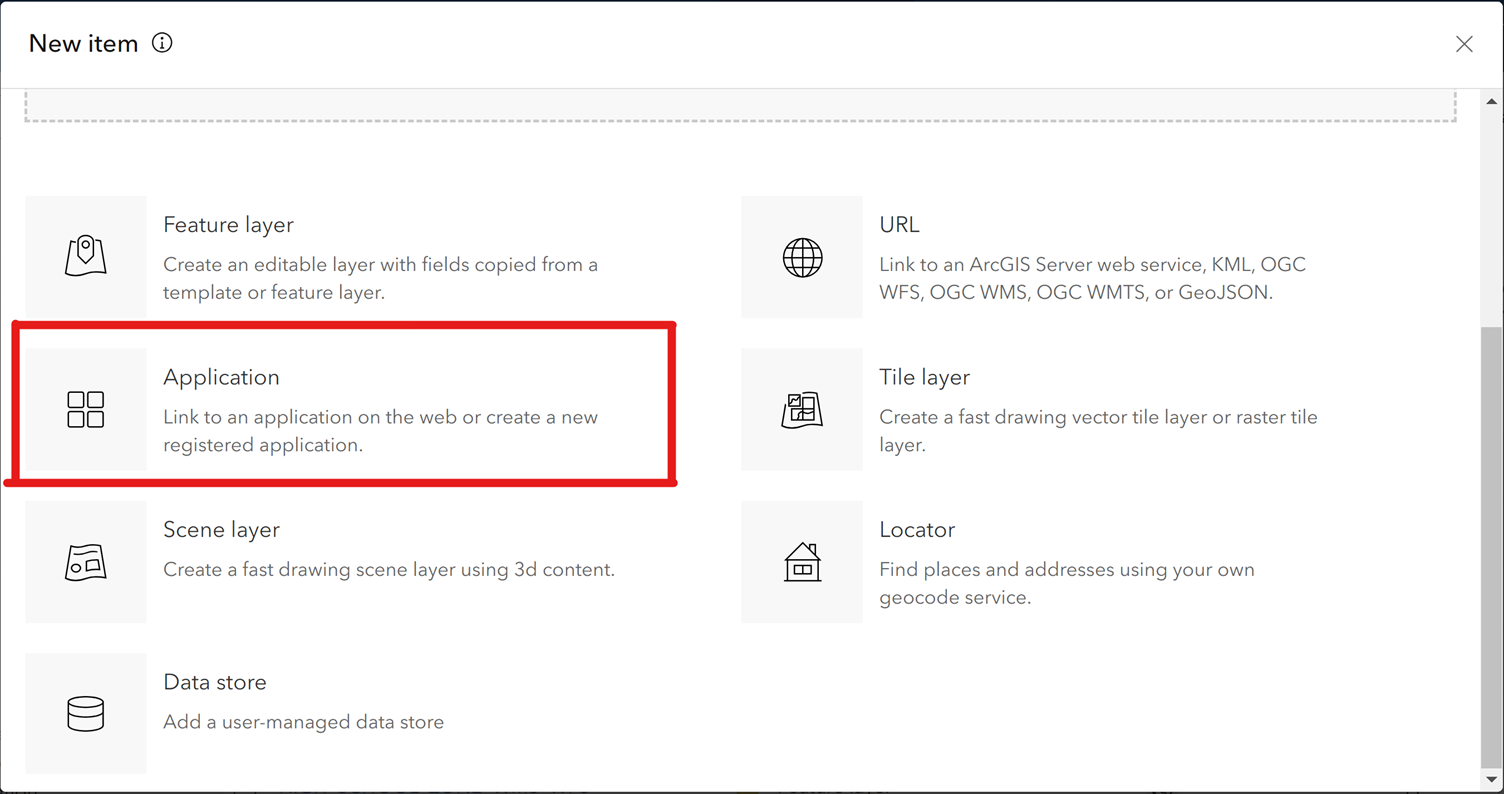
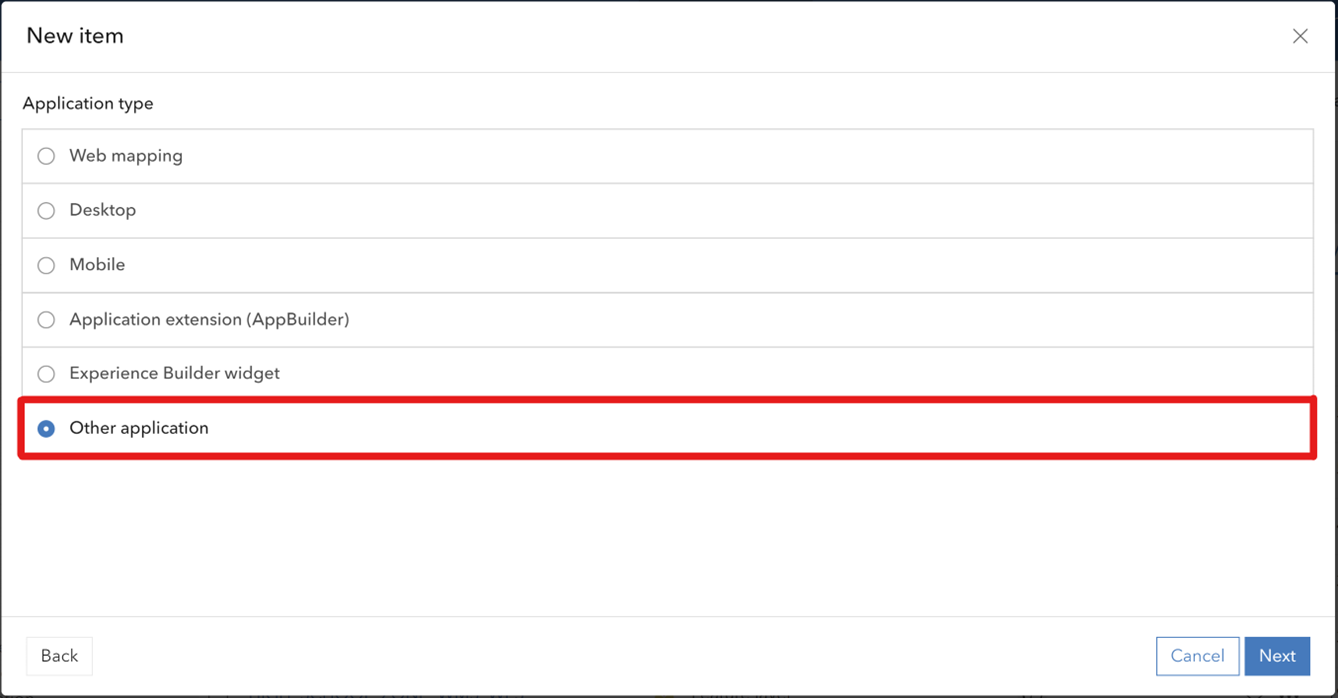
A new pop-up will appear, where you should select ‘Application,’ followed by ‘Other Application,’ as shown below.
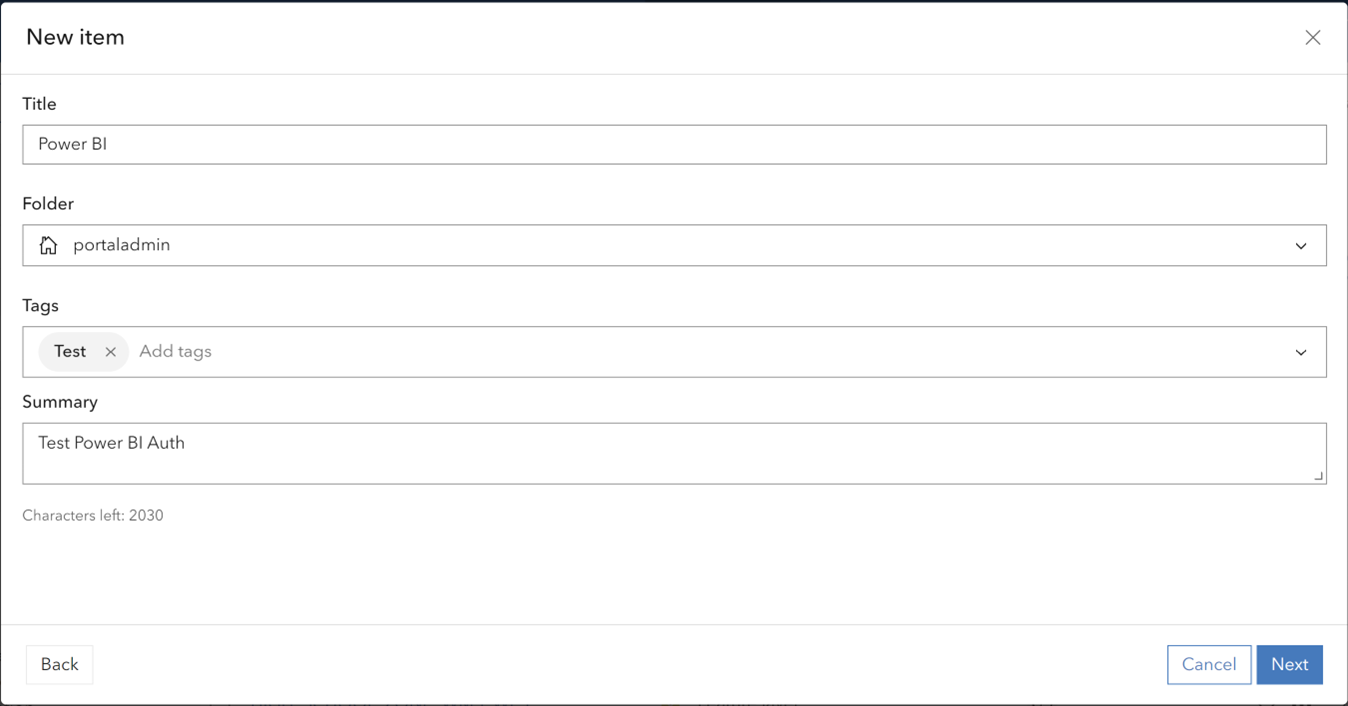
For this exercise, we will utilize the following details to create the application.
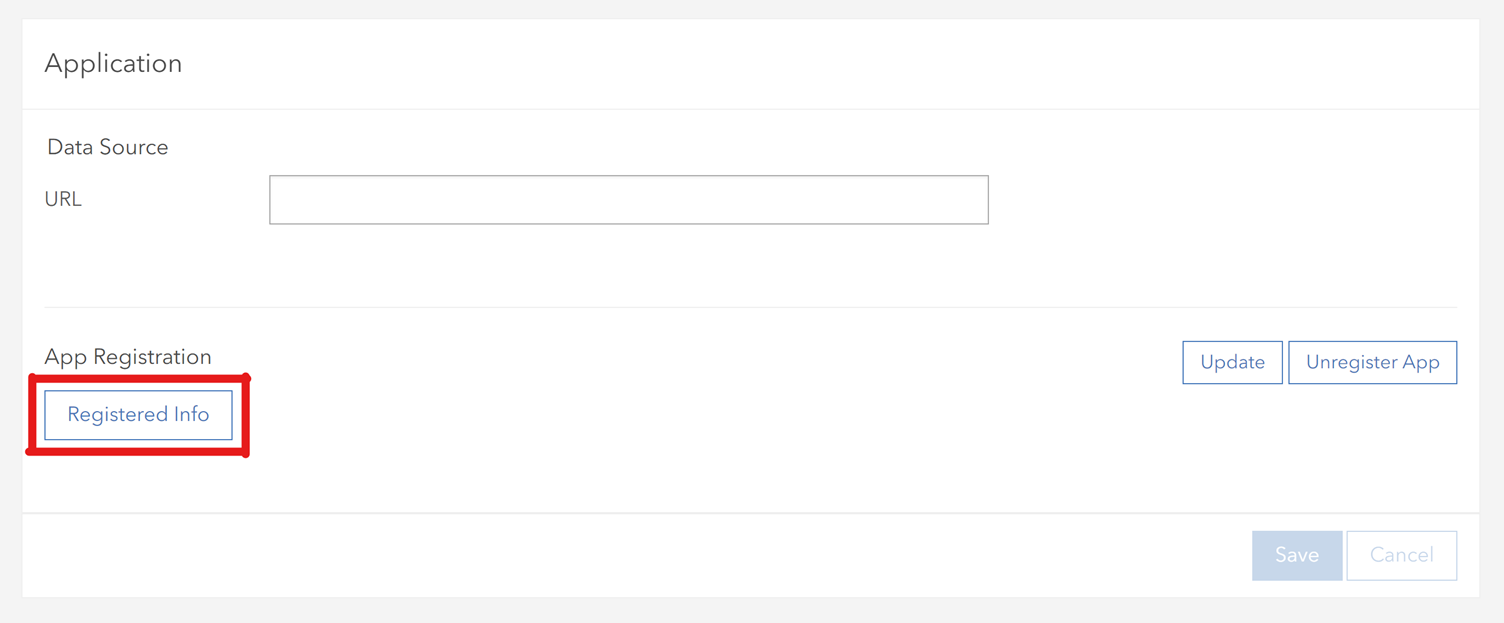
After creating the application, we need to navigate to the settings and register the application to obtain the client ID and secret.

After accessing the settings page, scroll down to the bottom and click on “Registered Info.”
This will provide us with the client ID and secrets, as illustrated below:
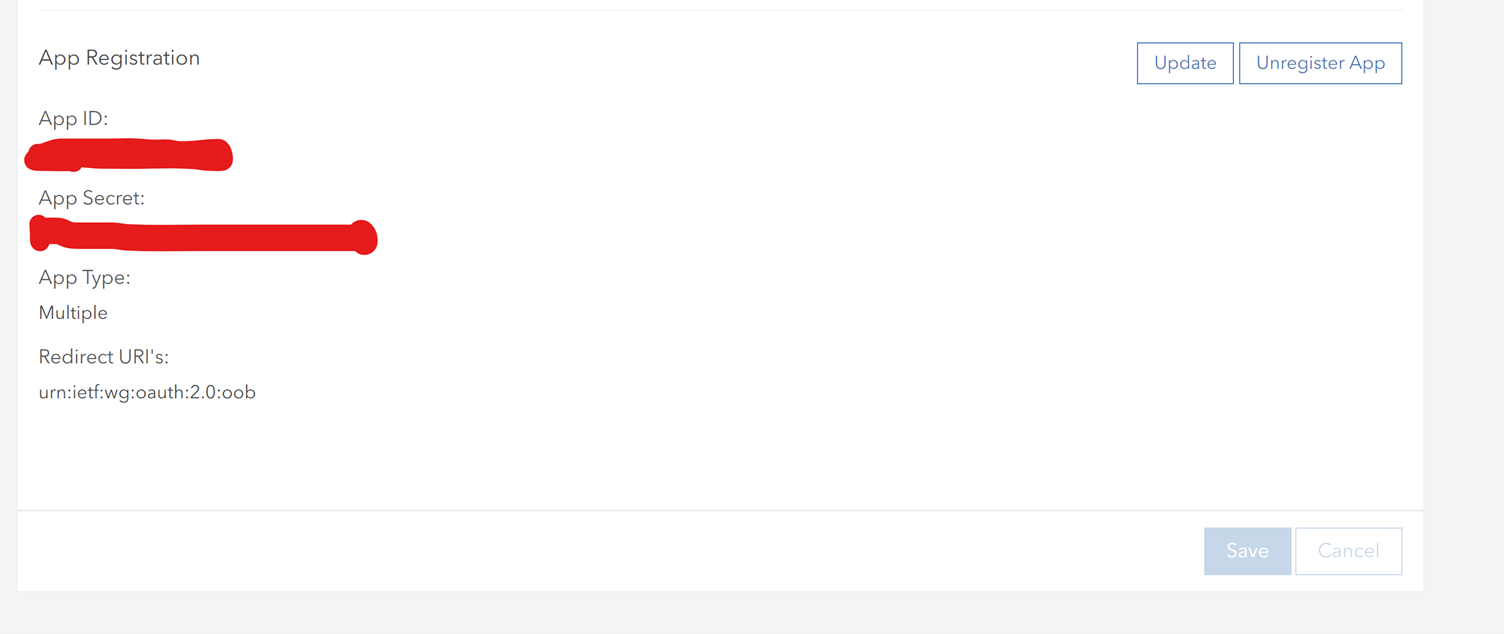
Now that we have our client ID and secret, let’s proceed to generate a temporary token for development purposes.
To generate a token in ArcGIS Enterprise, please go to https://[fqdn]/[webadaptor]/sharing/rest/generateToken, as demonstrated below:

Enter your username and password, and for the client, select ‘webapp URL,’ using your ArcGIS Enterprise’s fully qualified domain name without the web adaptor trailing. This will generate a token as demonstrated above.
Now that we have our client ID, client secret, and token, let’s proceed to build the Power BI query to pull the data from the ArcGIS Feature service into our Power BI.
Let’s navigate to the feature service that we intend to use, scroll to the bottom, click on ‘Copy,’ and then paste it in a new tab.

Click on the layer that interests us; in this example, we will use layer 0, titled ‘School Location’.
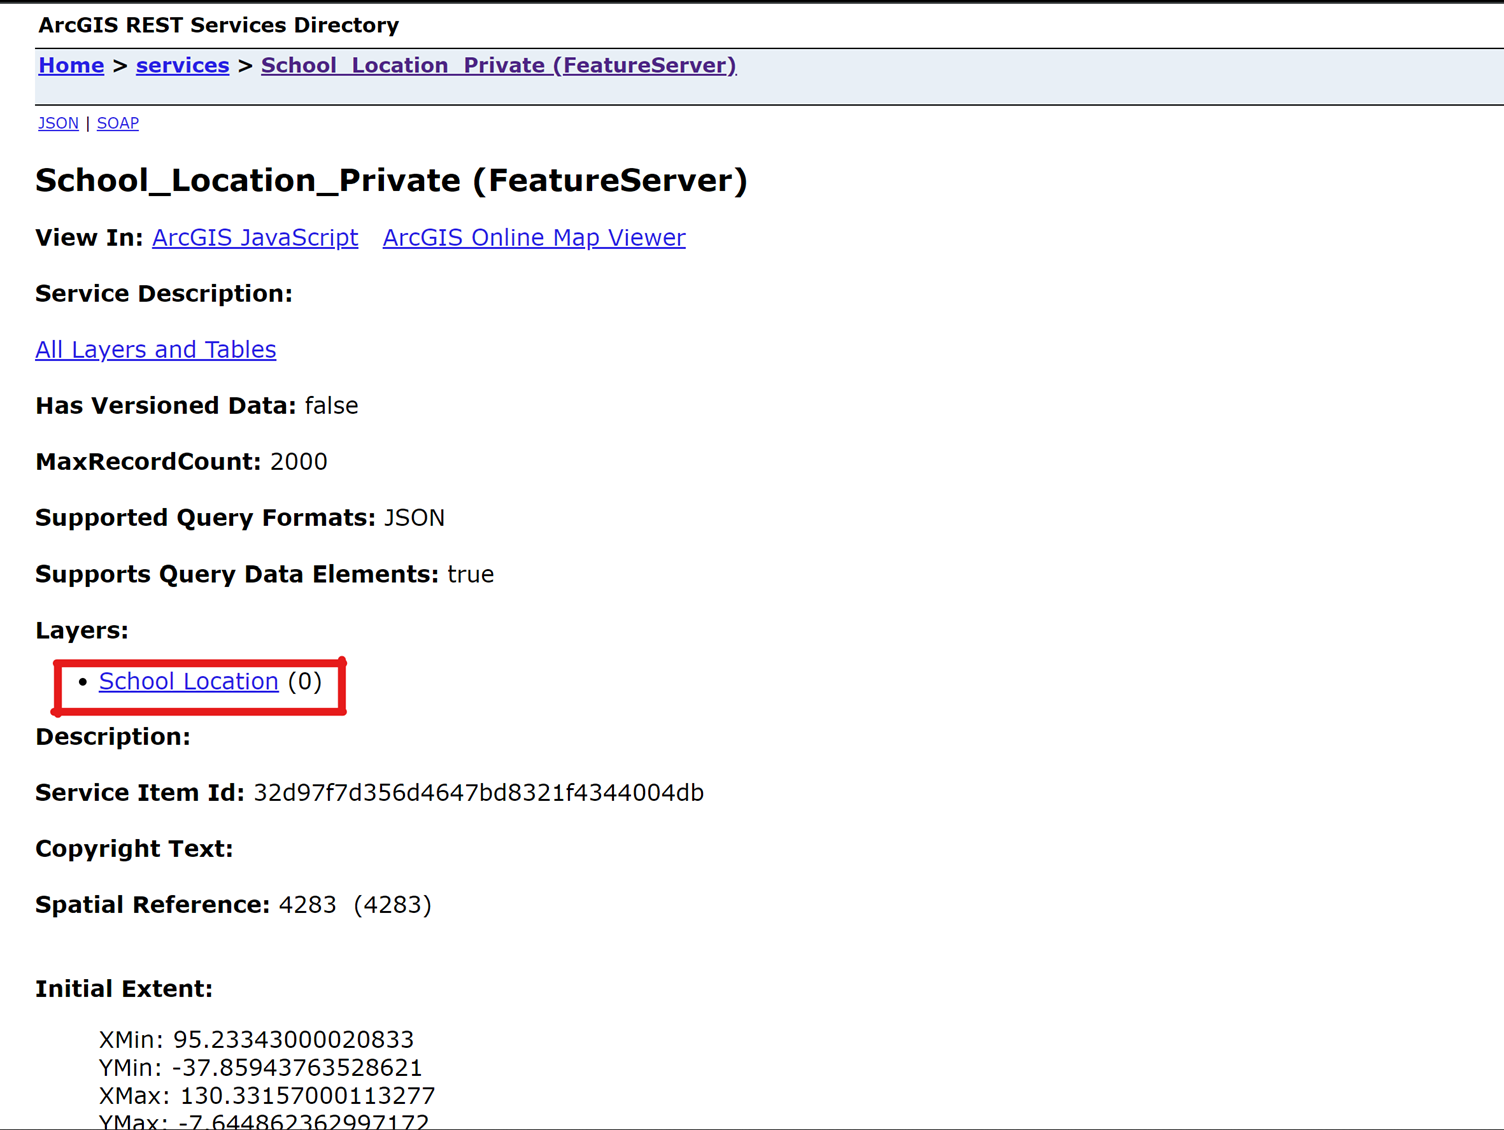
After accessing the layer, click on ‘Query,’ as demonstrated below.

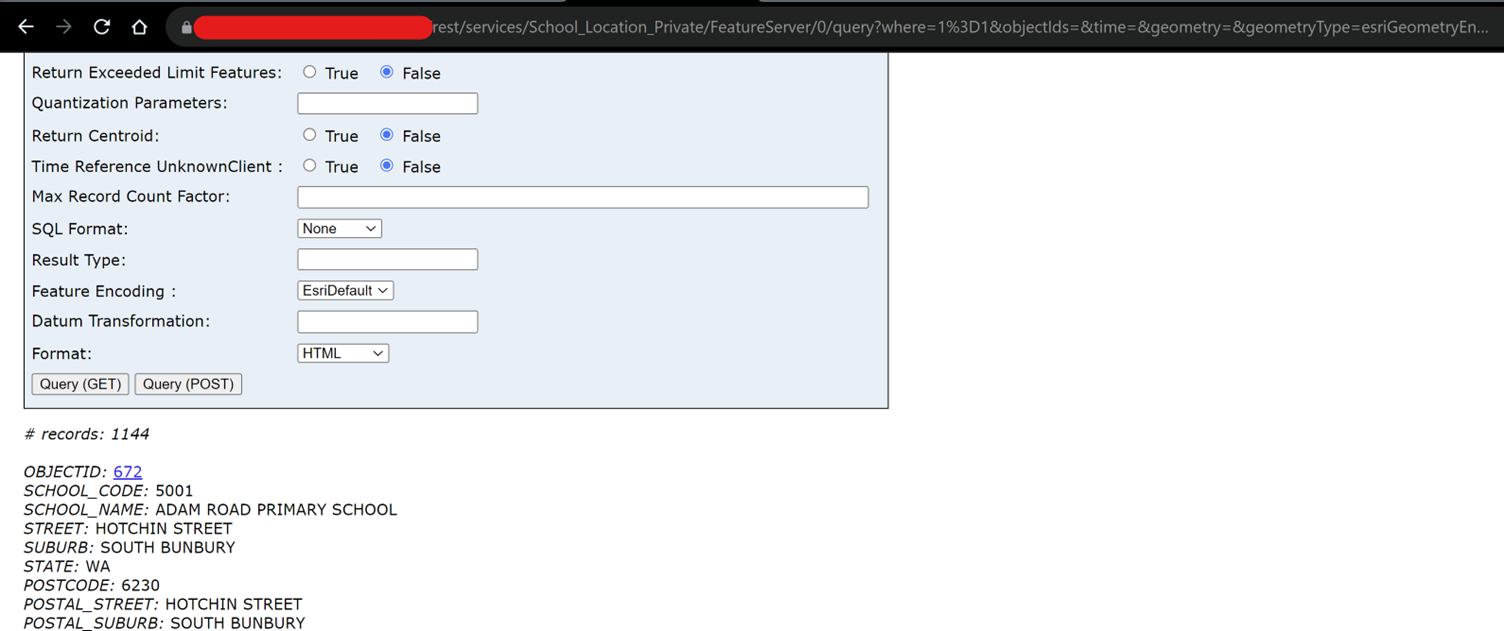
To create a sample query URL that will be copied to our Power BI, we need to fill in certain variables. In this example, the query will retrieve all the data and exclude the geometry. It’s essential to note that ArcGIS API has a limitation of returning 2000 records for each query, as indicated by the screenshot above (‘MaxRecordCount’).
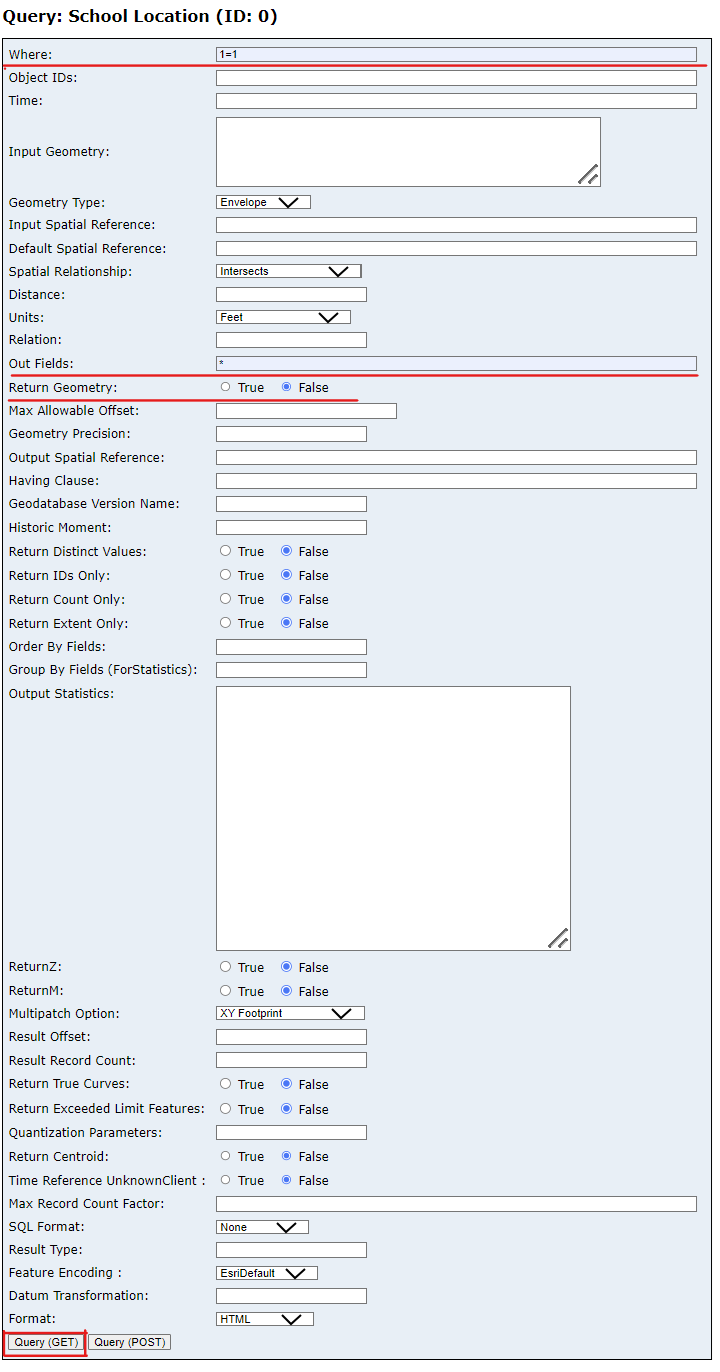
Once the query returns the results, copy out the URL on the browser, it should look something like this:
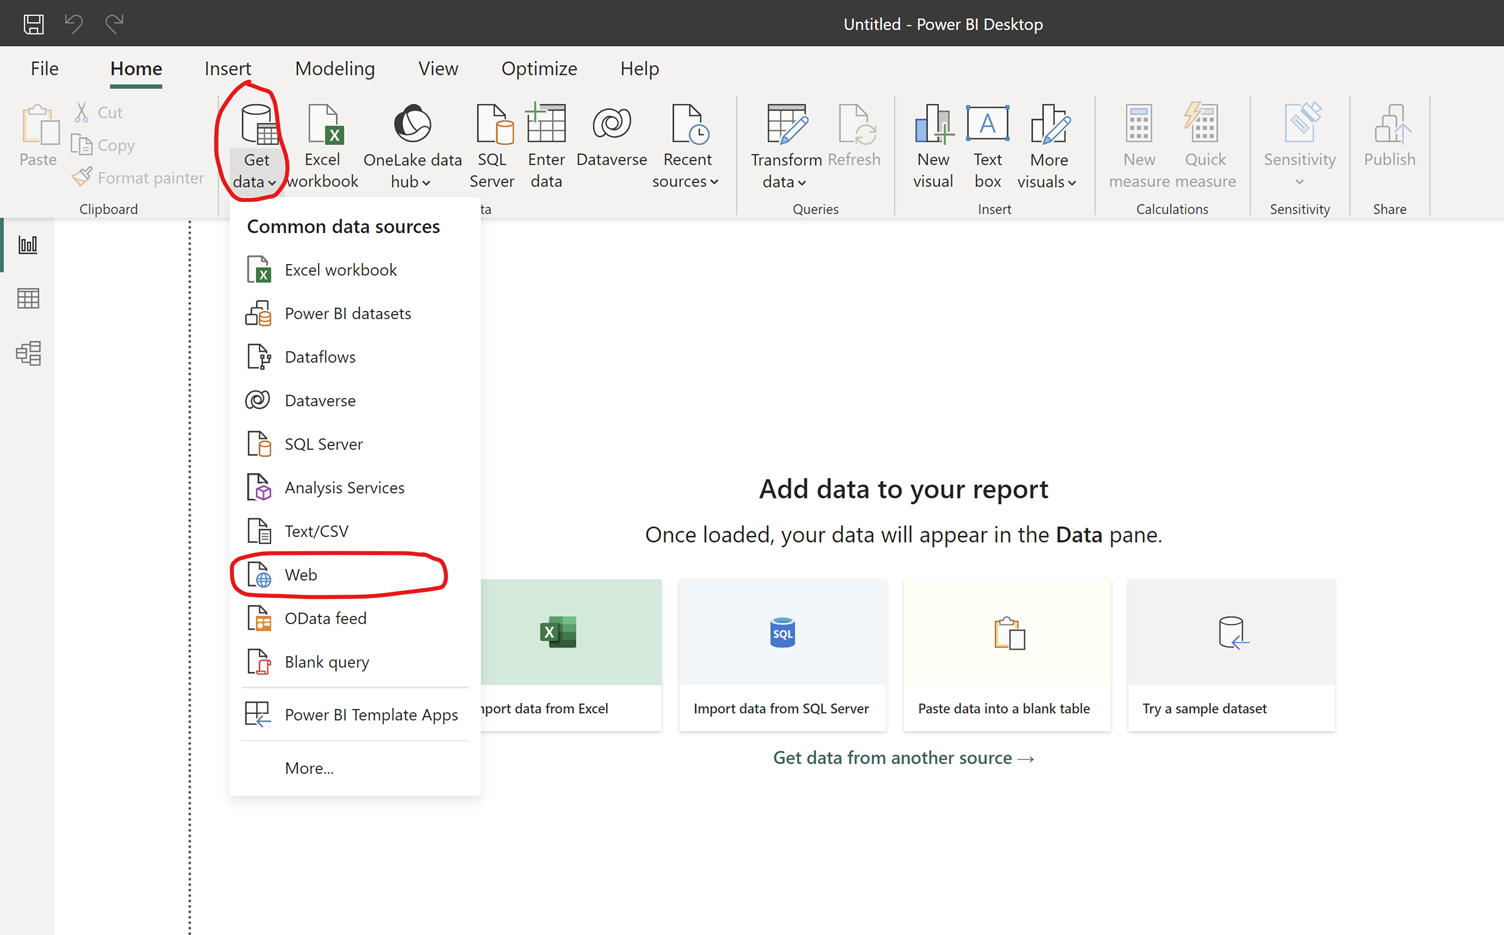
Now, open Power BI, select ‘Get Data,’ and then choose ‘Web,’ as illustrated below:
Paste the URL we copied earlier into the URL field, modify the value for “f” to json, and add the variable “token” along with the token generated earlier. Then, click OK, as demonstrated below:

After the results are presented, scroll to the far right and click on the first item from the right, as shown below:

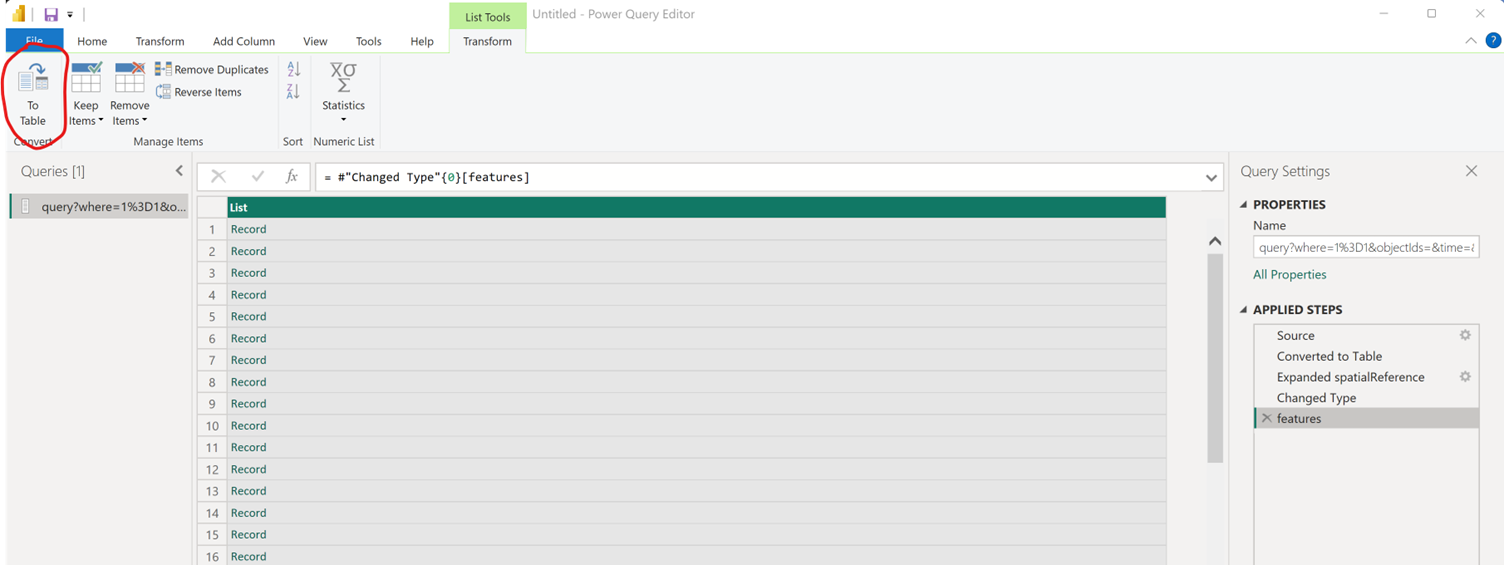
Next, you will be presented with the following window. Click on ‘To Table’ in the ‘Convert’ group.
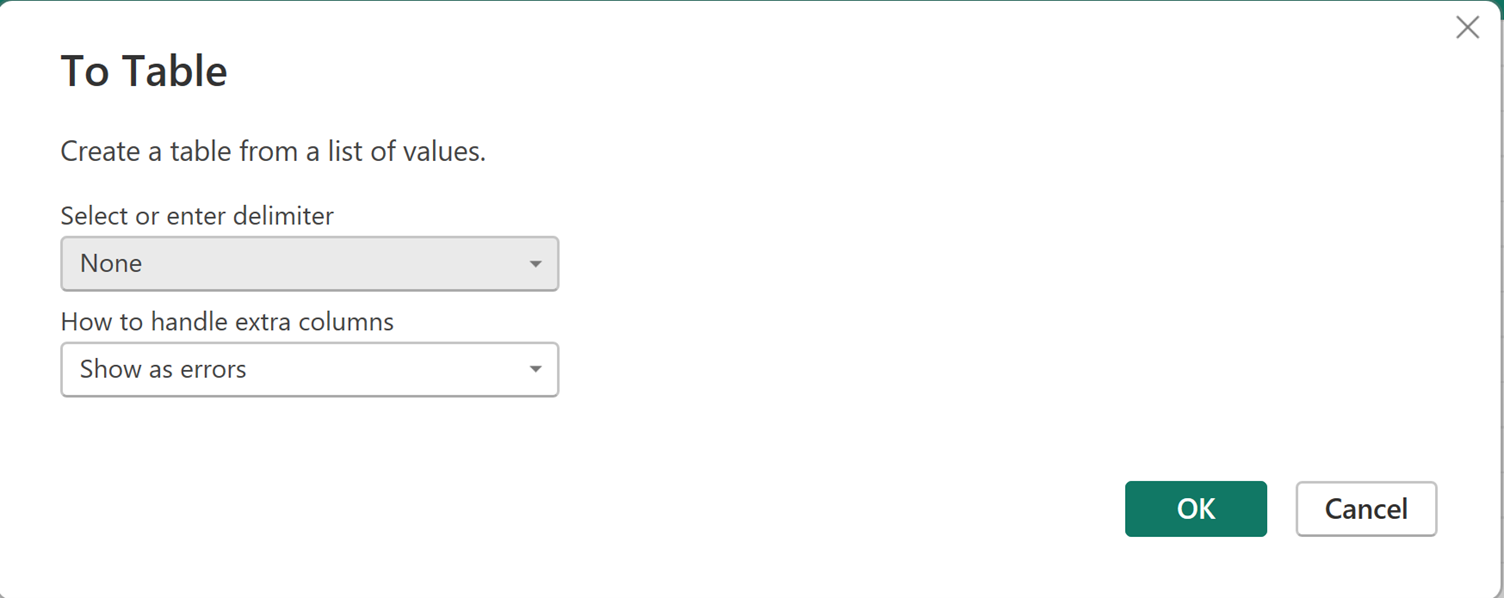
Subsequently, this window will appear, and you can simply click ‘OK’.
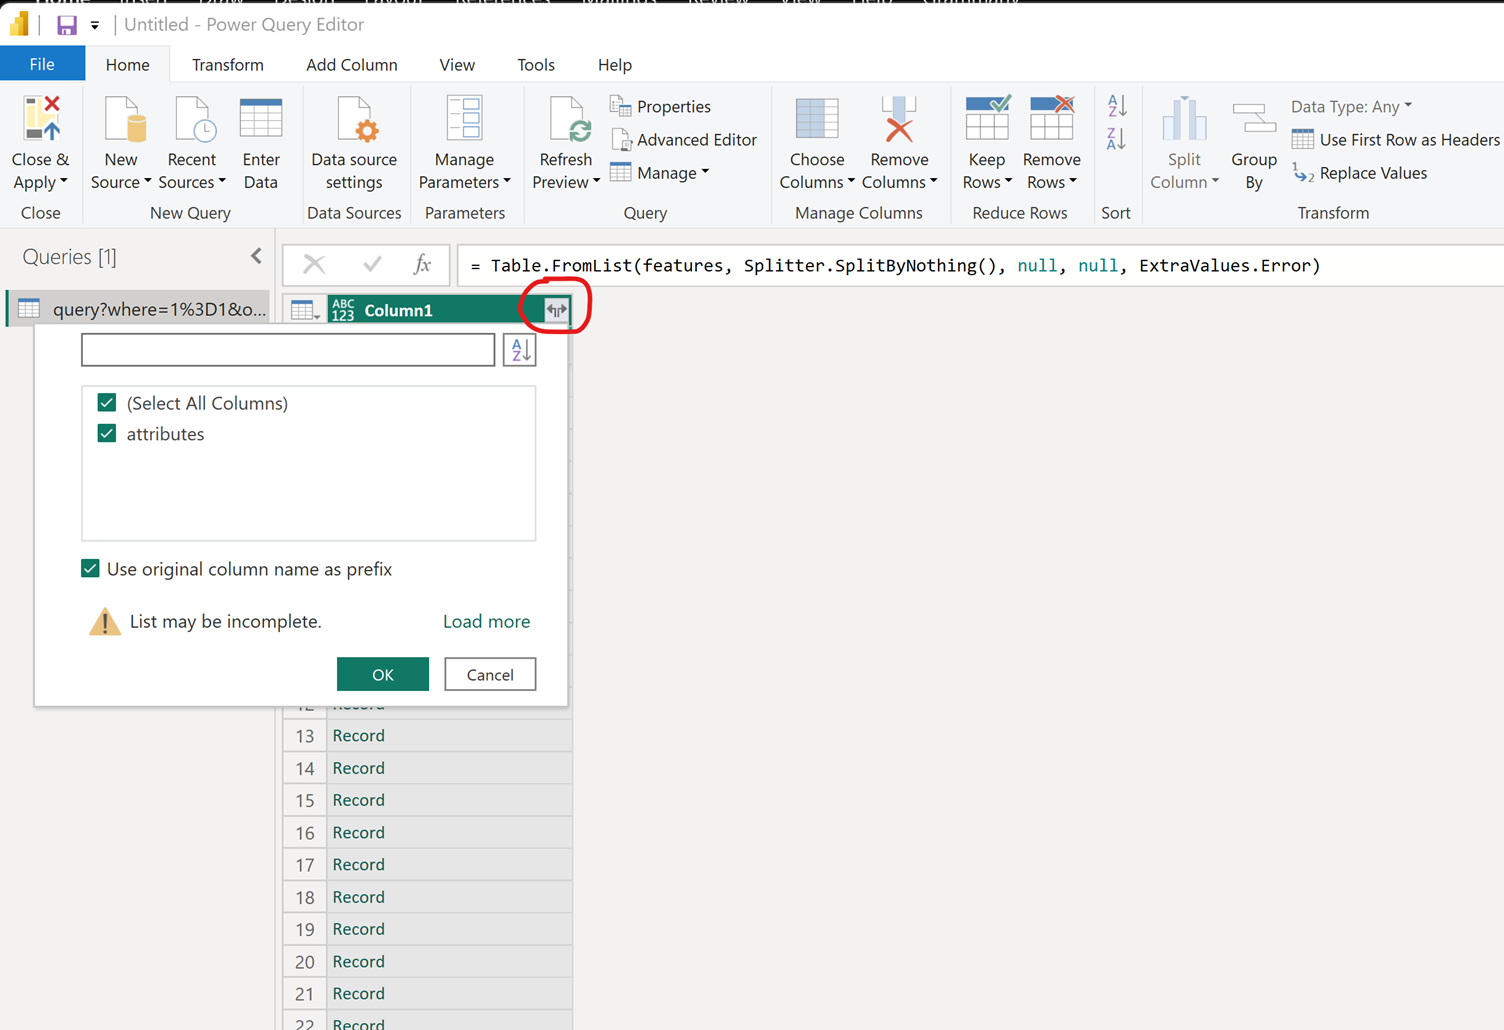
You will then see this window. Click on ‘Expand’, as circled in red, to view more fields. Ensure all fields are selected, and then click ‘OK’:
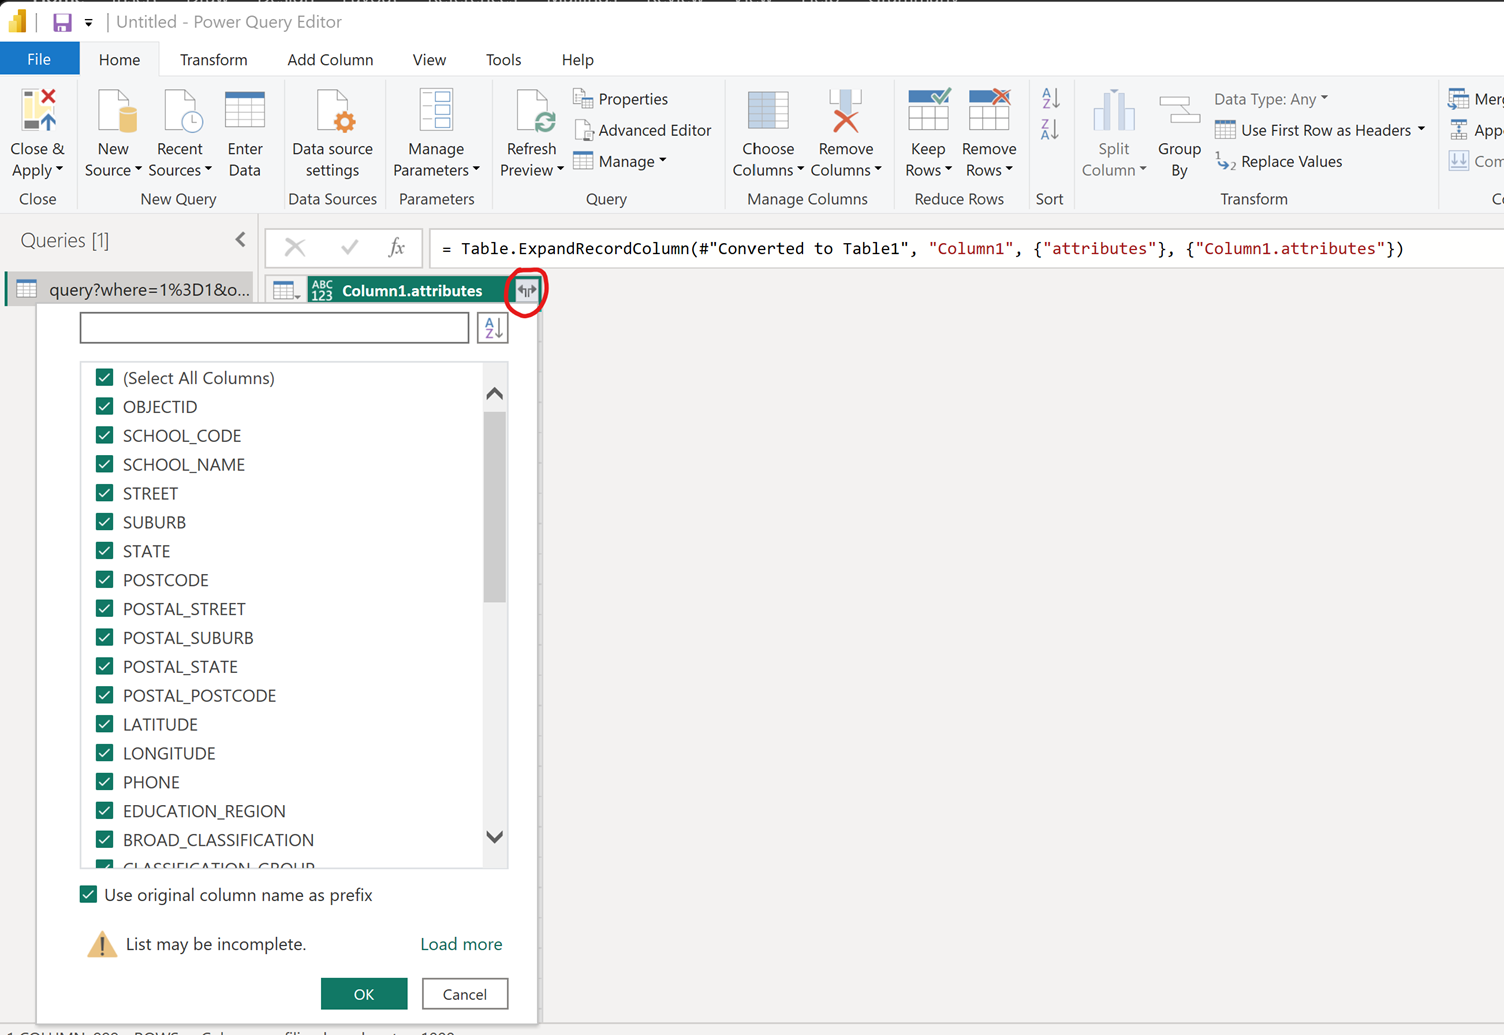
Click ‘Expand’ one more time to reveal all fields, ensure that all fields are selected, and click ‘OK,’ as shown below:
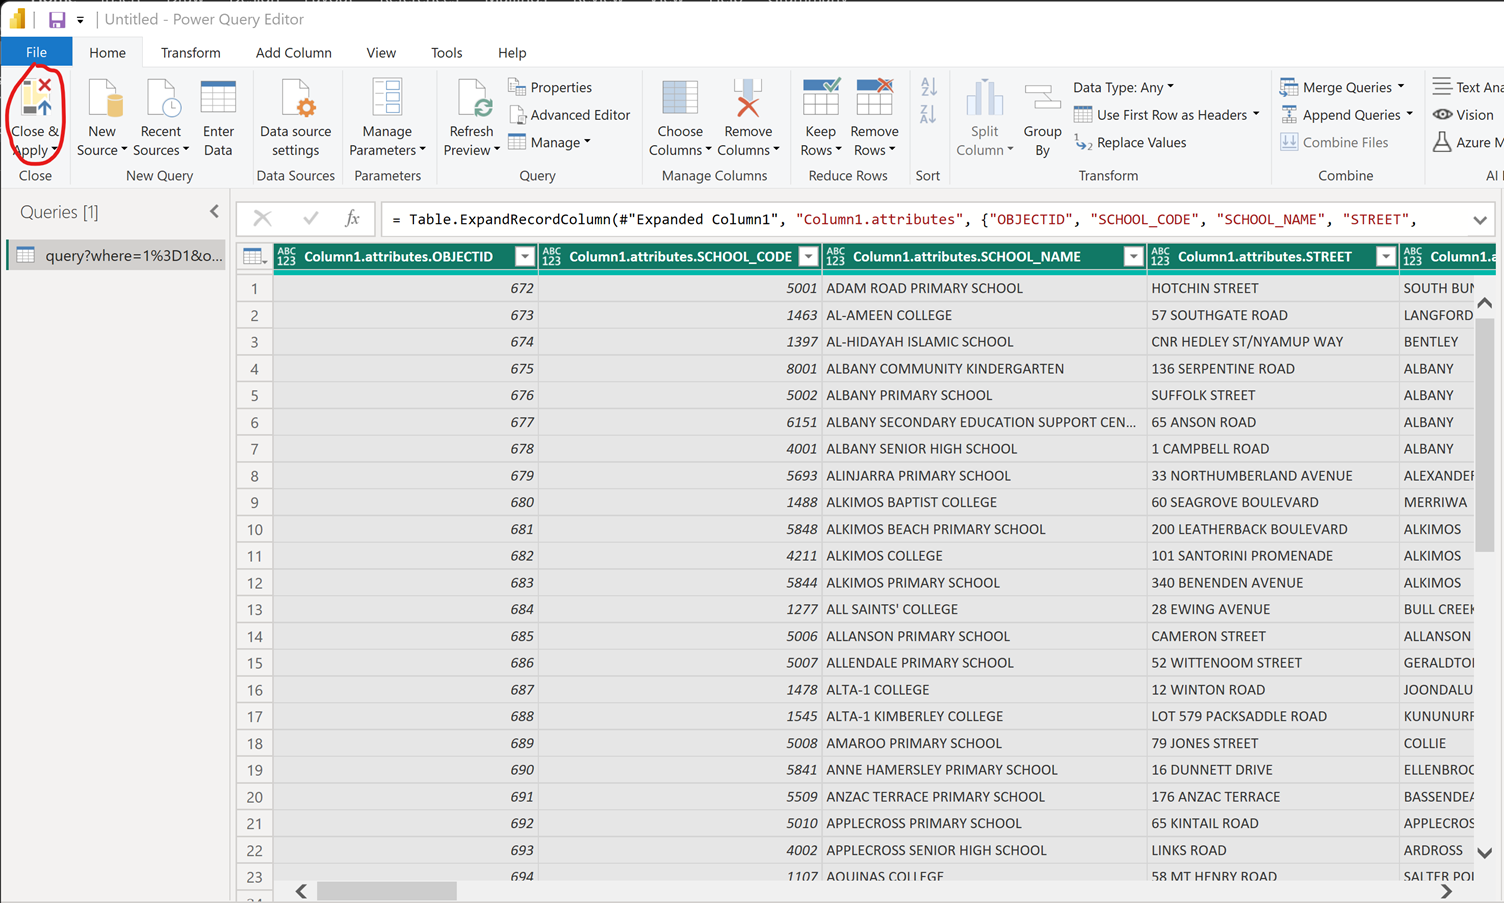
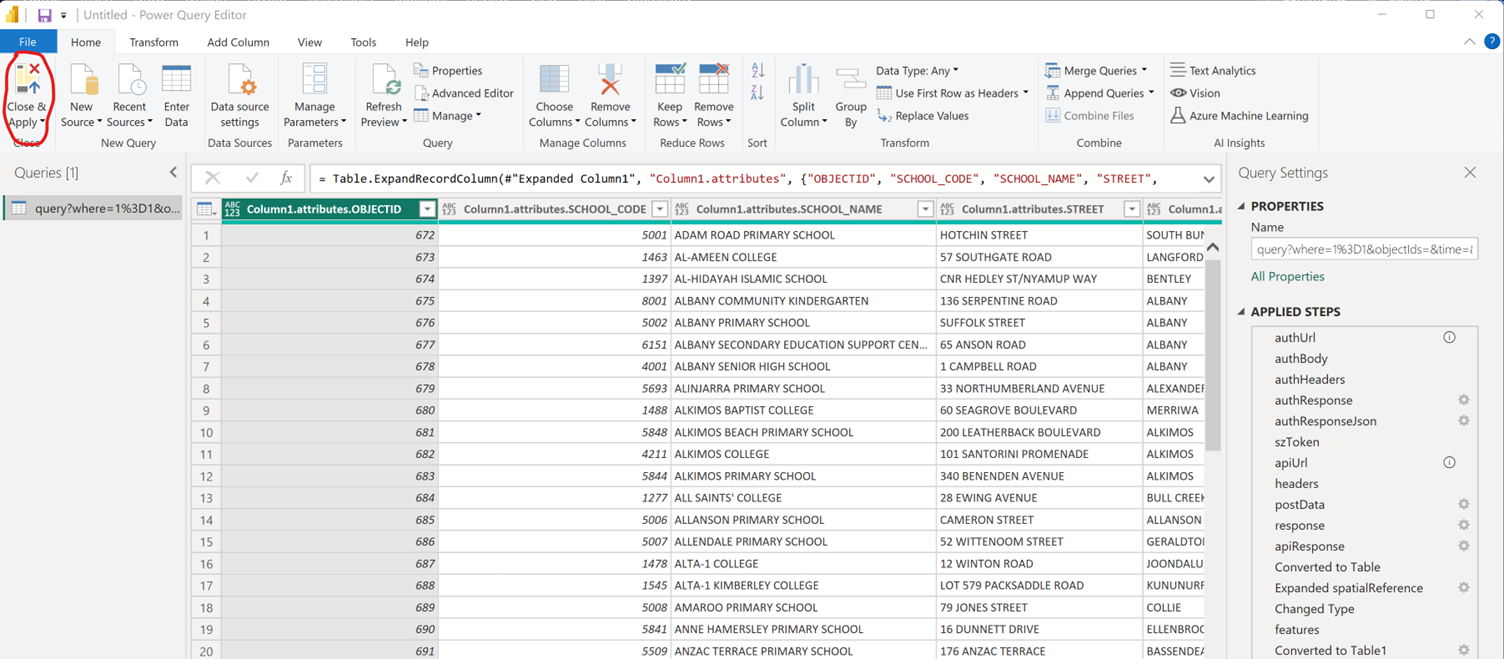
Now you will be able to see all the fields along with their data from the feature service:
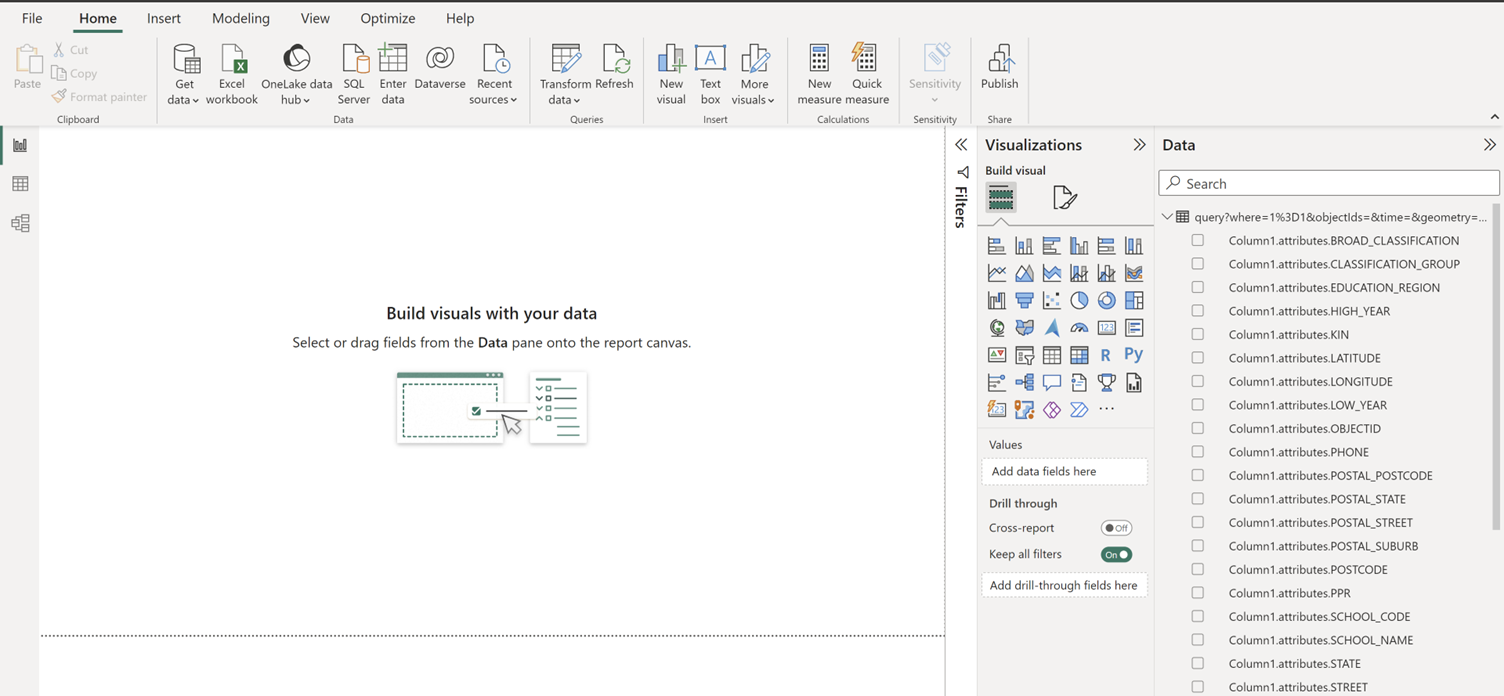
Now, let’s click on ‘Close & Apply,’ and the data will be imported, allowing us to begin using it to create our charts and conduct our analysis.
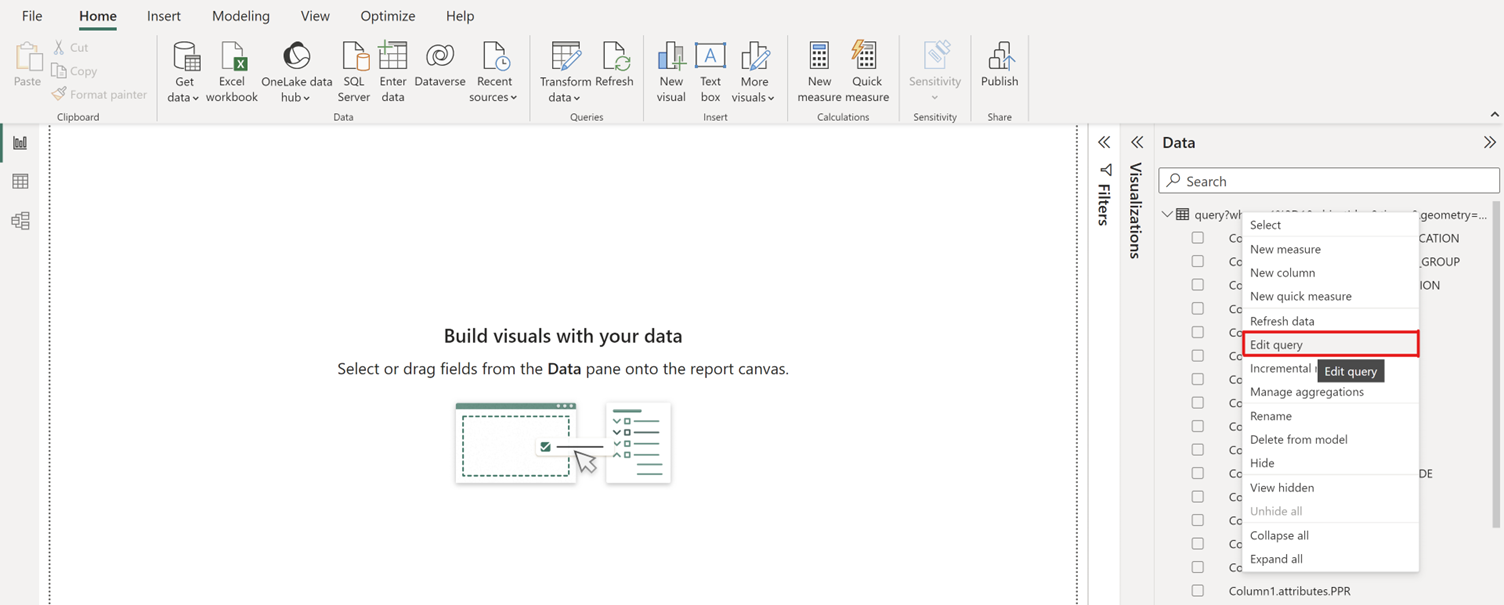
There is one more thing to consider: if we intend to publish the report to the Power BI web application and enable data refresh scheduling, a few additional steps are required to make it happen. To proceed, right-click on the query within the data tab and select “Edit Query,” as illustrated below:
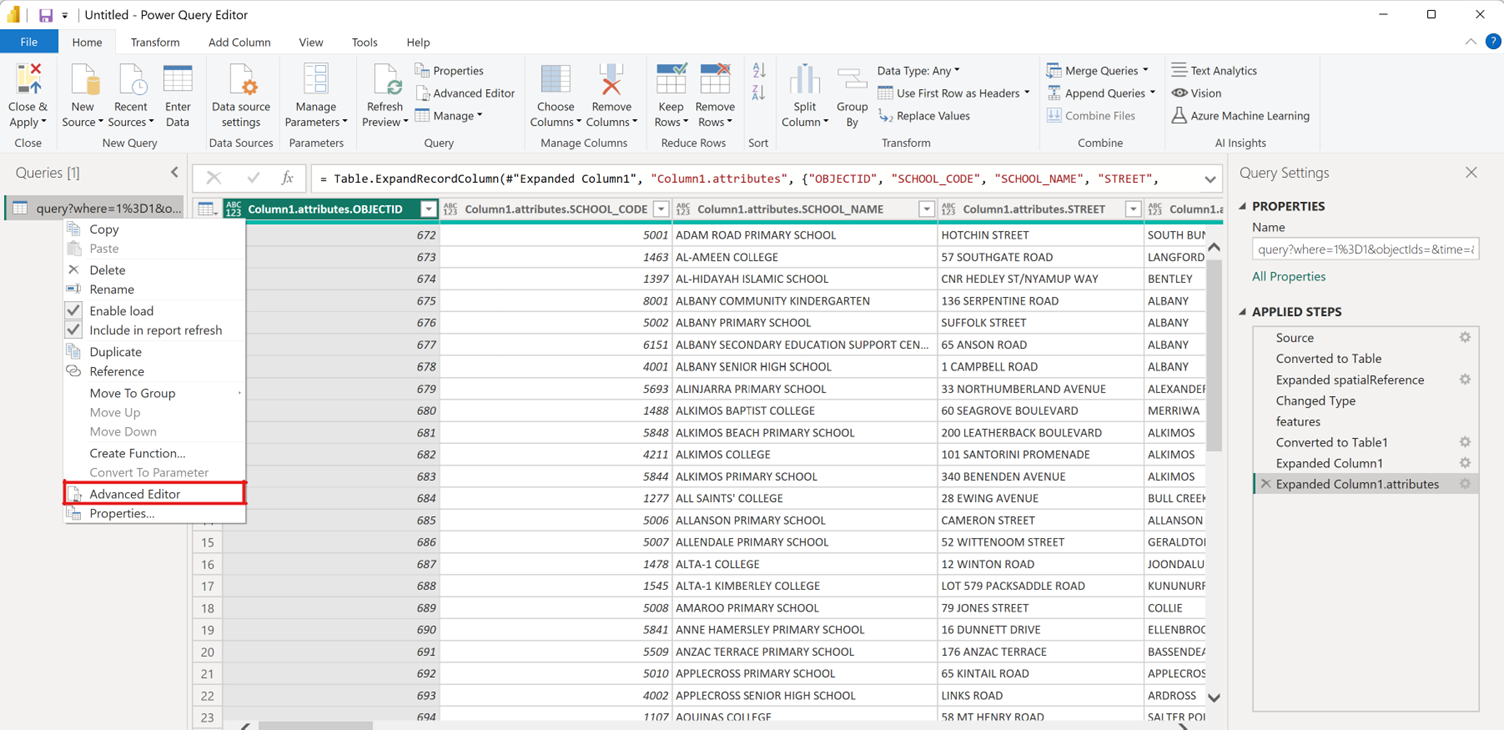
After accessing the Power Query Editor, right-click on the query located on your left-hand side, and then select “Advanced Editor,” as demonstrated below:
The advanced editor window will appear, as shown below:
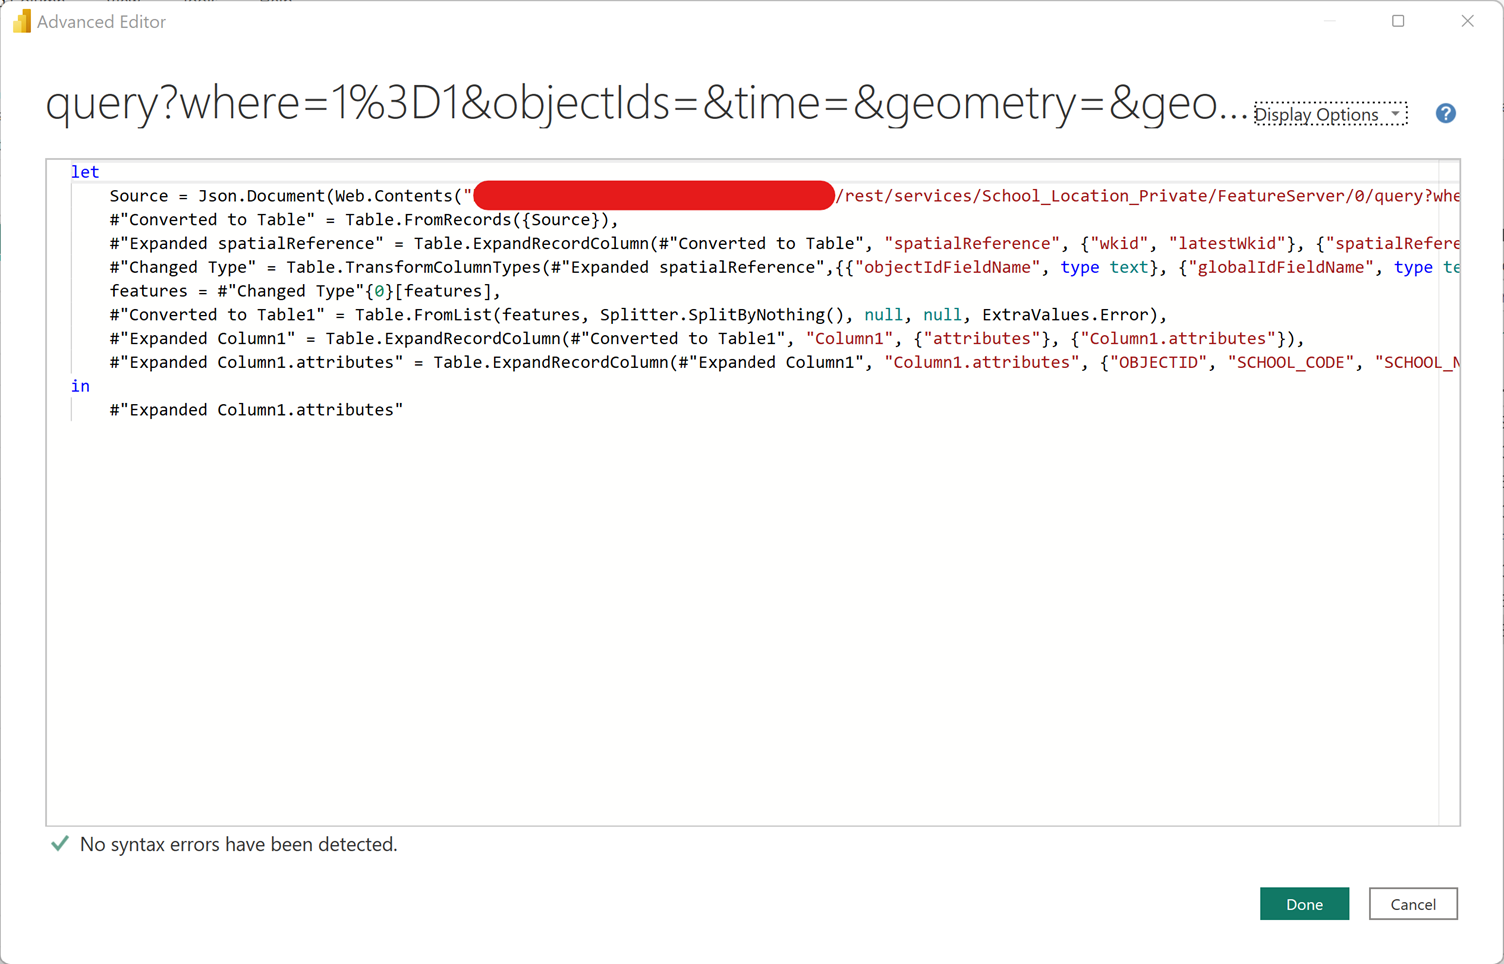
We need to make a few changes here so that when the report is published, the data can be scheduled to update from the ArcGIS Feature service through Power BI.
First and foremost, the token generated earlier will eventually expire, rendering us unable to access the data using that token. To address this, the ideal approach is to generate a new token each time Power BI is scheduled to download data from the ArcGIS Feature service. However, embedding usernames and passwords is considered unsafe and would violate IT Cybersecurity policies. To mitigate this, we will use OAuth 2.0 client ID and client secrets that were generated earlier in the process.
To generate the token, we added the following code in the Power Query Advanced Editor:

authUrl = “https://[FQDN]/[Web Adaptor]/sharing/rest/oauth2/token/”,
authBody = “grant_type=client_credentials&client_id=[client id]&client_secret=[client secret]”,
authHeaders = [#”Content-Type”=”application/x-www-form-urlencoded”],
authResponse = Web.Contents(authUrl, [Content = Text.ToBinary(authBody), Headers = authHeaders]),
authResponseJson = Json.Document(authResponse),
szToken = authResponseJson[access_token],
The ‘authUrl’ in the code represents the URL where the feature service is located:
- ArcGIS Online: https://www.arcgis.com/sharing/rest/oauth2/token/
- ArcGIS Enterprise: https://[FQDN]/[Web Adaptor]/sharing/rest/oauth2/token/
For ‘client_id’ and ‘client_secret,’ use the ones generated earlier.
Next, we added the second part of the Power Query to pull the data using the generated token. Here, we need to separate the URL from the Query variables, as Power BI does not allow dynamic URLs.”

apiUrl = “https://[FQDN]/[Web Adaptor]/rest/services/School_Location_Private/FeatureServer/0/query”,
headers = [#”Content-Type”=”application/x-www-form-urlencoded”],
postData = “where=1%3D1&objectIds=&time=&geometry=&geometryType=esriGeometryEnvelope&inSR=&defaultSR=&spatialRel=esriSpatialRelIntersects&distance=&units=esriSRUnit_Foot&relationParam=&outFields=*&returnGeometry=false&maxAllowableOffset=&geometryPrecision=&outSR=&havingClause=&gdbVersion=&historicMoment=&returnDistinctValues=false&returnIdsOnly=false&returnCountOnly=false&returnExtentOnly=false&orderByFields=&groupByFieldsForStatistics=&outStatistics=&returnZ=false&returnM=false&multipatchOption=xyFootprint&resultOffset=&resultRecordCount=&returnTrueCurves=false&returnExceededLimitFeatures=false&quantizationParameters=&returnCentroid=false&timeReferenceUnknownClient=false&maxRecordCountFactor=&sqlFormat=none&resultType=&featureEncoding=esriDefault&datumTransformation=&f=json&token=” & szToken,
response = Web.Contents(apiUrl, [Headers = headers, Content = Text.ToBinary(postData)]),
apiResponse = Json.Document(response),
#”Converted to Table” = Table.FromRecords({apiResponse}),
#”Expanded spatialReference” = Table.ExpandRecordColumn(#”Converted to Table”, “spatialReference”, {“wkid”, “latestWkid”}, {“spatialReference.wkid”, “spatialReference.latestWkid”}),
#”Changed Type” = Table.TransformColumnTypes(#”Expanded spatialReference”,{{“objectIdFieldName”, type text}, {“globalIdFieldName”, type text}, {“geometryType”, type text}, {“spatialReference.wkid”, Int64.Type}, {“spatialReference.latestWkid”, Int64.Type}, {“hasM”, type logical}, {“hasZ”, type logical}, {“fields”, type any}, {“features”, type any}}),
features = #”Changed Type”{0}[features],
#”Converted to Table1″ = Table.FromList(features, Splitter.SplitByNothing(), null, null, ExtraValues.Error),
#”Expanded Column1″ = Table.ExpandRecordColumn(#”Converted to Table1″, “Column1”, {“attributes”}, {“Column1.attributes”}),
#”Expanded Column1.attributes” = Table.ExpandRecordColumn(#”Expanded Column1″, “Column1.attributes”, {“OBJECTID”, “SCHOOL_CODE”, “SCHOOL_NAME”, “STREET”, “SUBURB”, “STATE”, “POSTCODE”, “POSTAL_STREET”, “POSTAL_SUBURB”, “POSTAL_STATE”, “POSTAL_POSTCODE”, “LATITUDE”, “LONGITUDE”, “PHONE”, “EDUCATION_REGION”, “BROAD_CLASSIFICATION”, “CLASSIFICATION_GROUP”, “KIN”, “PPR”, “Y01”, “Y02”, “Y03”, “Y04”, “Y05”, “Y06”, “UPR”, “Y07”, “Y08”, “Y09”, “Y10”, “Y11”, “Y12”, “USED”, “TOTAL_STUDENT”, “LOW_YEAR”, “HIGH_YEAR”}, {“Column1.attributes.OBJECTID”, “Column1.attributes.SCHOOL_CODE”, “Column1.attributes.SCHOOL_NAME”, “Column1.attributes.STREET”, “Column1.attributes.SUBURB”, “Column1.attributes.STATE”, “Column1.attributes.POSTCODE”, “Column1.attributes.POSTAL_STREET”, “Column1.attributes.POSTAL_SUBURB”, “Column1.attributes.POSTAL_STATE”, “Column1.attributes.POSTAL_POSTCODE”, “Column1.attributes.LATITUDE”, “Column1.attributes.LONGITUDE”, “Column1.attributes.PHONE”, “Column1.attributes.EDUCATION_REGION”, “Column1.attributes.BROAD_CLASSIFICATION”, “Column1.attributes.CLASSIFICATION_GROUP”, “Column1.attributes.KIN”, “Column1.attributes.PPR”, “Column1.attributes.Y01”, “Column1.attributes.Y02”, “Column1.attributes.Y03”, “Column1.attributes.Y04”, “Column1.attributes.Y05”, “Column1.attributes.Y06”, “Column1.attributes.UPR”, “Column1.attributes.Y07”, “Column1.attributes.Y08”, “Column1.attributes.Y09”, “Column1.attributes.Y10”, “Column1.attributes.Y11”, “Column1.attributes.Y12”, “Column1.attributes.USED”, “Column1.attributes.TOTAL_STUDENT”, “Column1.attributes.LOW_YEAR”, “Column1.attributes.HIGH_YEAR”})
At the end of the ‘Post data’ section, we included the token and modified the value of ‘f’ to ‘json’.
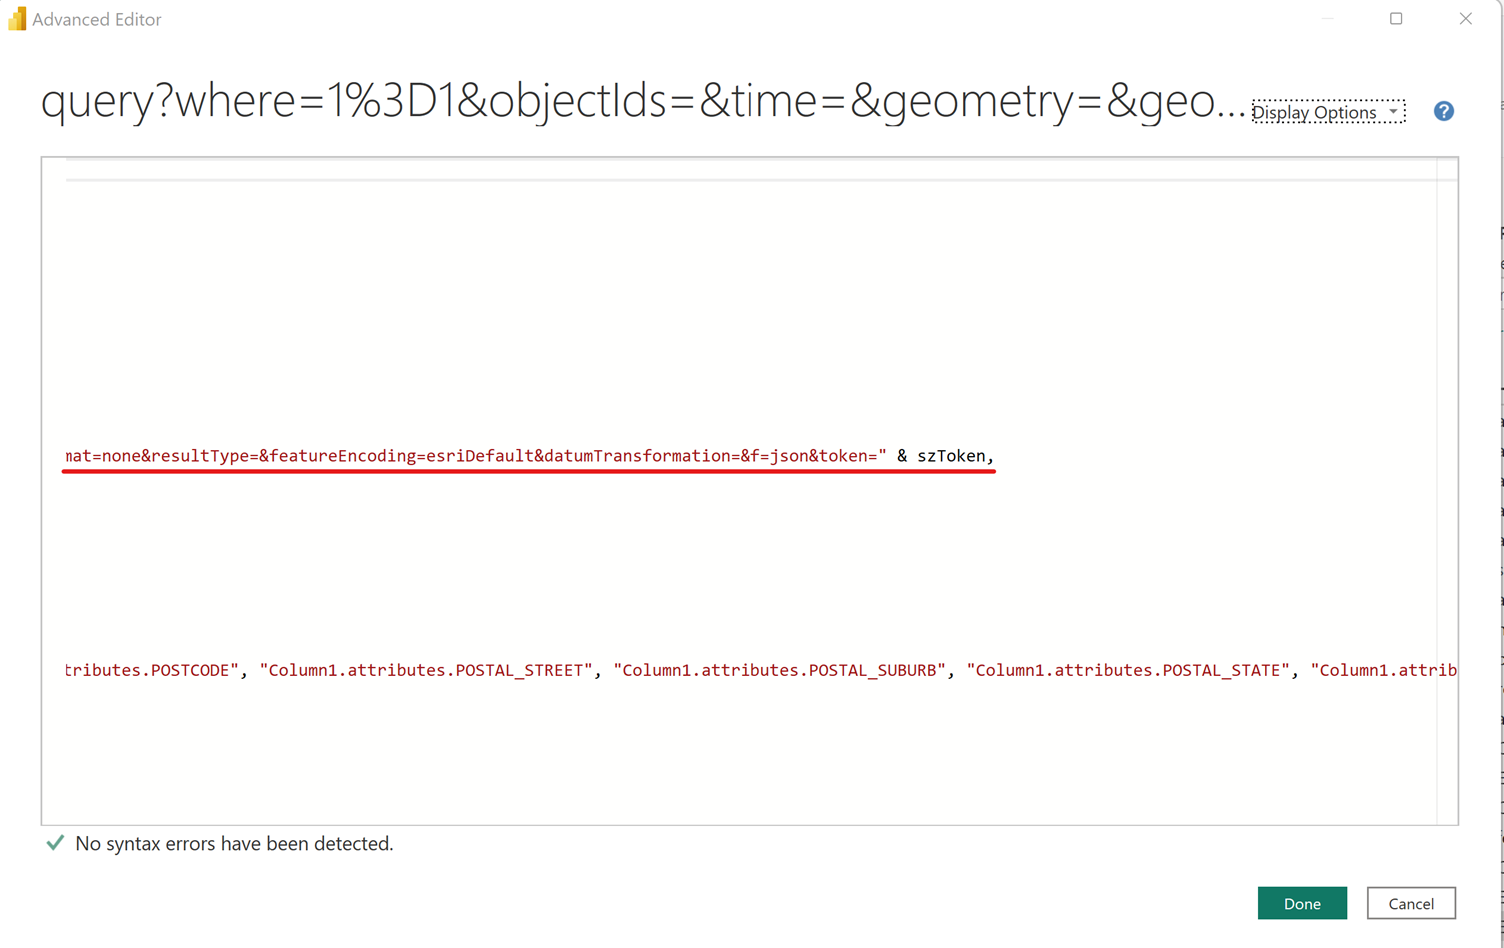
This will bypass the non-dynamic URL restriction imposed by Power BI. Once the Power Query is accepted, Power BI will prompt for Data Privacy, as shown below:
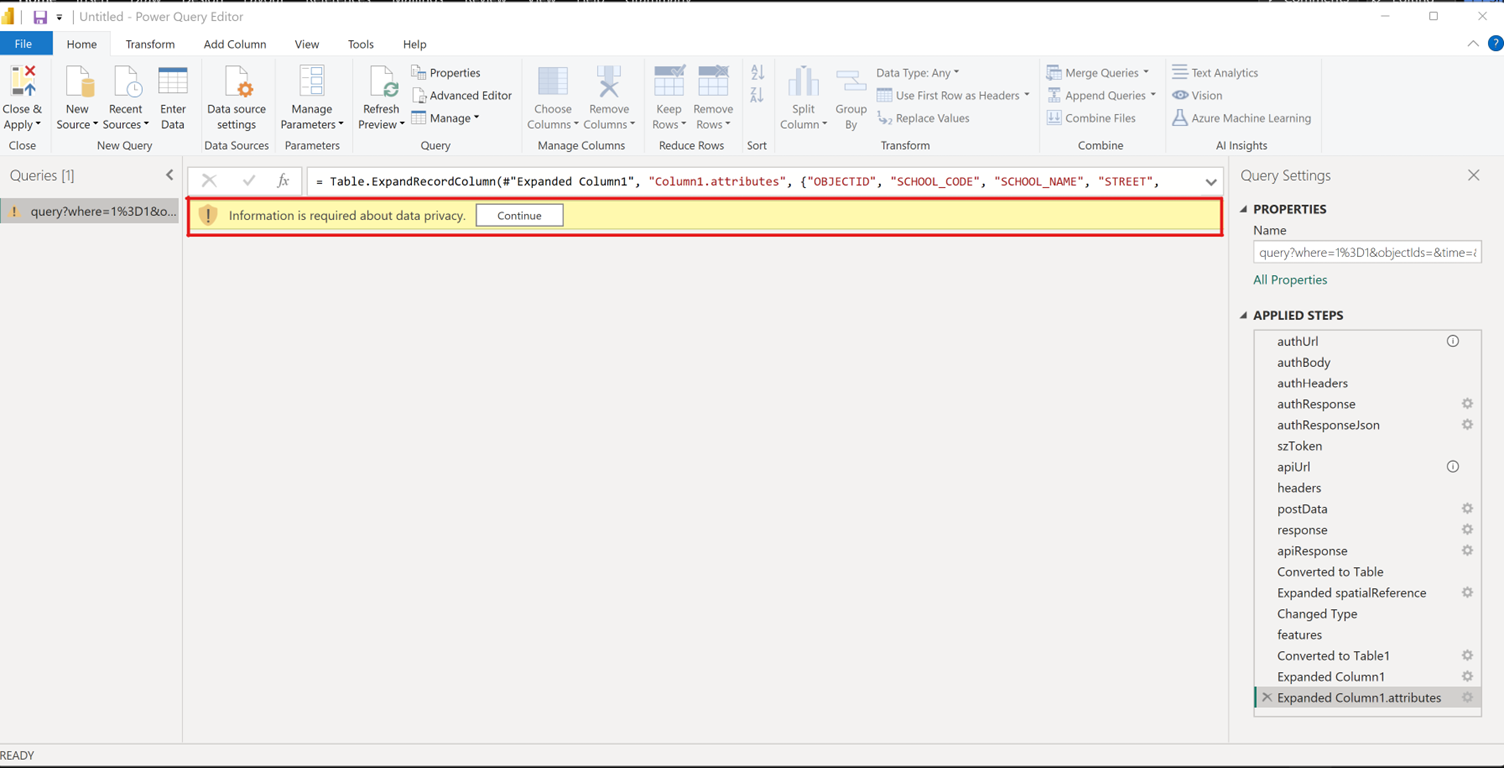
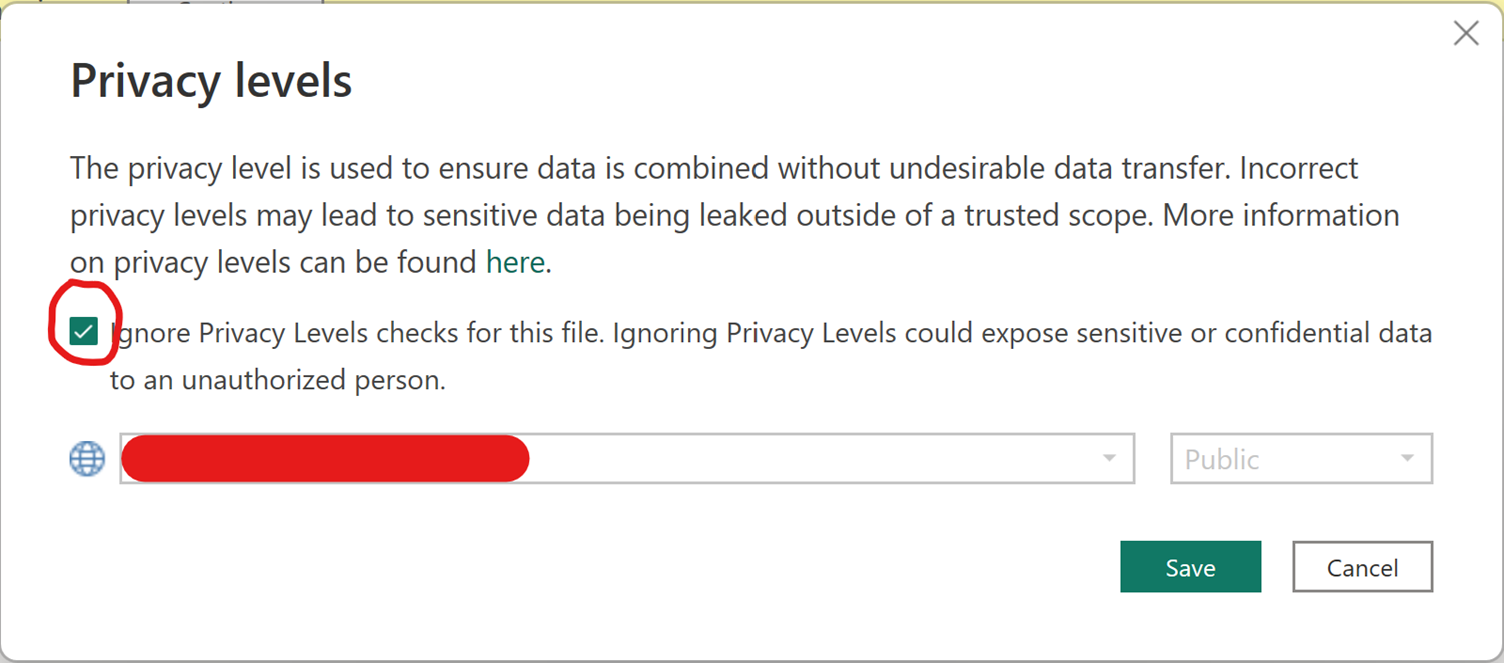
Just click ‘Continue,’ and for this example, we will ignore privacy, so tick ‘Ignore’ and click ‘Save’.
Now we can click “Close & Apply”.
Finally, let’s create some reports and publish them to Power BI Web. For this example, we will use a stacked bar chart and ArcGIS Map for Power BI.
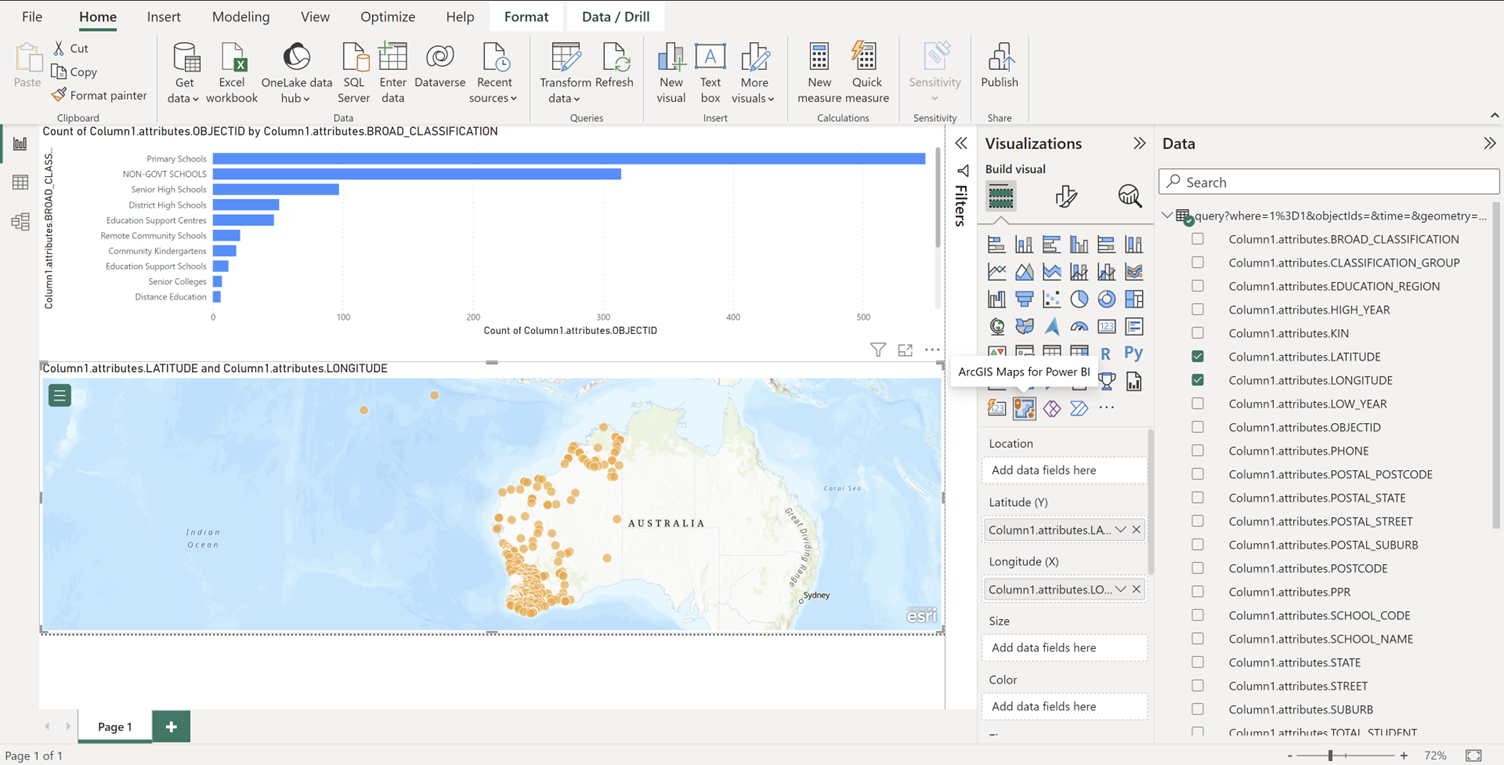
Once published, we will observe two new entries in the Power BI Web Workspace: one for the report and another for the dataset.

We need to navigate to the dataset and schedule a refresh:

Once the schedule refresh is opened, there are two credentials that need to be addressed:

Click on “Edit credentials,” and the following window will appear:
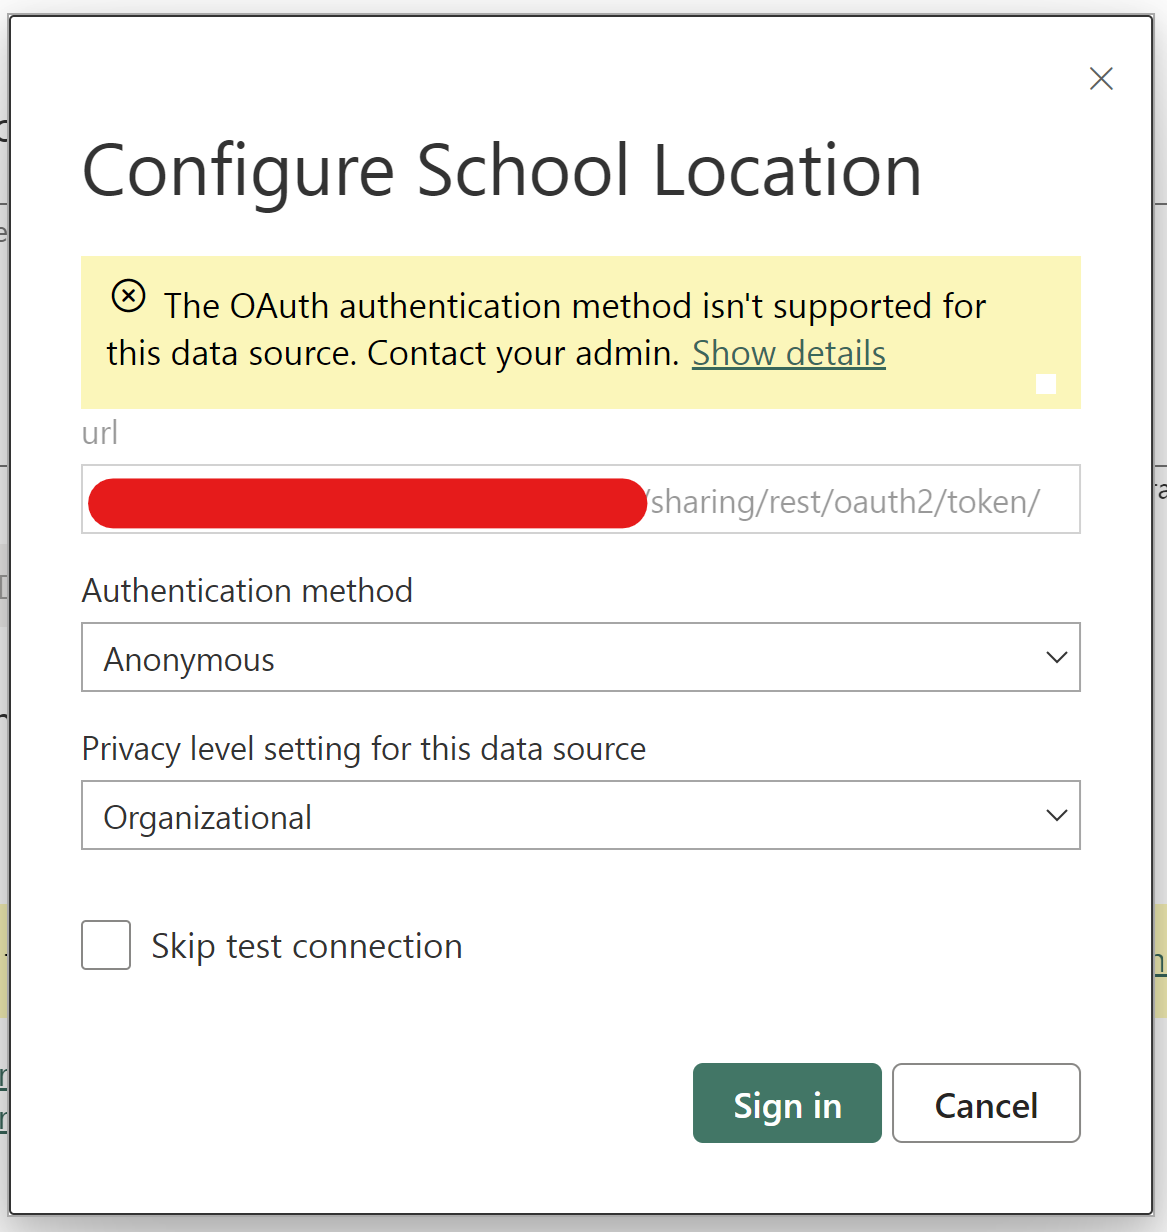
Leave the authentication method as ‘Anonymous’ and select ‘Organizational’ for the ‘Privacy level setting for this data source.’ Repeat the same for both.
Once this is done, you can schedule data refresh or manually refresh the dataset from the Power BI web app.
Please note that the ArcGIS API typically supports a maximum of 2000 rows per query. If you have more than 2000 rows, please feel free to contact us for a more sophisticated solution to link Power BI with the ArcGIS Feature Service.
